🫀 Anatomy of a Schematics Project
Introduction
When embarking on a new Schematics project, you will encounter a structure that looks like this:
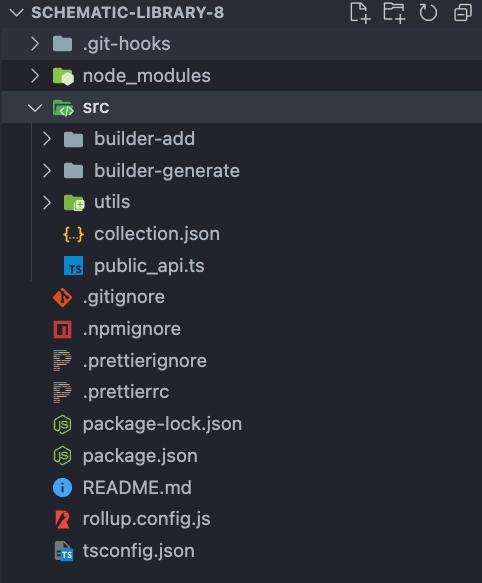
- Within the
srcdirectory is a vital file namedcollection.json. This file is central to your Schematics project as it contains all the schematics’ definitions. Without proper declarations here, the schematics cannot be utilized. - There are two noteworthy folders:
builder-addandbuilder-generate. Thebuilder-addfolder includes special schematics that are triggered upon integrating the library into your project withbuilder add [collection-name]. Thebuilder-generatefolder encompasses all your schematics.
Important Files
collection.json
Imagine collection.json as the table of contents for your Schematic project. This file acts as a central directory, listing all the Schematics you’ve created or included in your project. It tells the Builder CLI what Schematics are available, how to find them, and some basic details about each one, like what they do and how they should be run.
Each entry in collection.json represents a single Schematic. For each Schematic, you’ll provide:
- Description: A brief explanation of what the Schematic does. This helps users understand the purpose of the Schematic.
- Factory: The path to the factory file for the Schematic. This links your Schematic to its instructions, telling the CLI how to execute the Schematic.
- Schema: The path to the schema file, which defines the options or configurations users can set when running the Schematic.
- Hidden: A boolean indicating whether the Schematic should be hidden from lists in the CLI. Useful for internal or experimental Schematics.
- Extends: (If applicable) Indicates if your Schematic extends another, inheriting its functionality.
- Private: A boolean to mark if the Schematic is intended for private use and shouldn’t be executed directly by end-users.
- Aliases: Shortcuts or alternative names for running the Schematic. This makes it easier to use.
Here’s an analogy: if your Schematic project were a book, collection.json would be its table of contents, and each Schematic would be a chapter listed in it, with a summary (description) and a page number (path to the factory file).
By organizing your Schematics in the collection.json file, you make it easy for the Builder CLI (and users of your library) to discover and use the Schematics you’ve developed.
| Property | Type | Optional |
|---|---|---|
| description | string | Yes |
| factory | string | Yes |
| schema | string | No |
| hidden | boolean | No |
| extends | string | No |
| private | boolean | No |
| aliases | array of strings | No |
We can see an example of a collection:
{ "$schema": "../node_modules/@angular-devkit/schematics/collection-schema.json", "schematics": { "builder-add": { "description": "Add the library to the project", "factory": "./builder-add/builder-add.factory", "schema": "./builder-add/schema.json" }, "scan": { "description": "Scan project and represent into a json file", "factory": "./builder-generate/scan-project/scan.factory#scan", "aliases": [ "s" ] }, "build": { "description": "Execute all the schematics with the json file", "factory": "./builder-generate/build/build.factory#executeWorkspaceSchematics", "aliases": [ "b" ] }, "checkPackages": { "description": "Check collections", "factory": "./builder-generate/check-packages/check-packages.factory#checkPackages", "hidden": true }, "checkProjects": { "description": "Check collections", "factory": "./builder-generate/check-projects/check-projects.factory#checkProjects", "hidden": true }, "uninstallPackages": { "description": "Uninstall collections", "factory": "./builder-generate/uninstall-packages/uninstall-packages.factory#uninstallPackages", "hidden": true }, "AddCollectionsAngularJson": { "description": "Add collections to angular.json", "factory": "./builder-generate/add-collections-angular-json/add-collections-angular-json.factory#AddCollectionsAngularJson", "hidden": true } }}schema.json
This file outlines the prompts presented to users before a schematic is executed, dictating the interaction flow and ensuring a smooth user experience. more details
Factory File
Think of a factory file as the brain behind each Schematic in your project. This file contains the specific instructions, or “blueprint,” that tells your Schematic what to do when it’s run. For example, whether to add a new component, modify an existing file, or generate a new service, the factory file has the code to make it happen.
When you define a Schematic in your collection.json, you link it to its factory file. This link ensures that when your Schematic is executed, the Builder CLI knows exactly where to find the instructions to carry out the Schematic’s intended actions.
Here’s a simple way to understand it:
- Schematic: A command or task you want to run.
- Factory File: The detailed instructions on how the task is performed.
For every Schematic you create, there will be a corresponding factory file that contains the logic for that Schematic. The name and location of this file are specified in your collection.json, ensuring a direct connection between the command and its execution logic.
In essence, without the factory file, your Schematic wouldn’t know what to do. It’s crucial for executing the specific tasks you’ve designed in your Schematics project.